User Interface & Workspaces
The utiLITI editor is structured around high-productivity level design and code authoring workflows. This guide explores every region of the editor window, its toolbars, dockable panels, and productivity features.
The Workspace Rail
On the far left edge of the window is the Workspace Rail, allowing you to switch between the two primary modes with a single click:
- Map Workspace: Opens the 2D visual level design canvas, entity hierarchy, layer table, and property inspector.
- Scripts Workspace: Opens the integrated Monaco code editor, class outline, script explorer, diagnostics dock, and JDI debugger.
Opening a script file from the asset tree or double-clicking an attached script in the inspector automatically switches to the Scripts Workspace.
Window Layout Overview
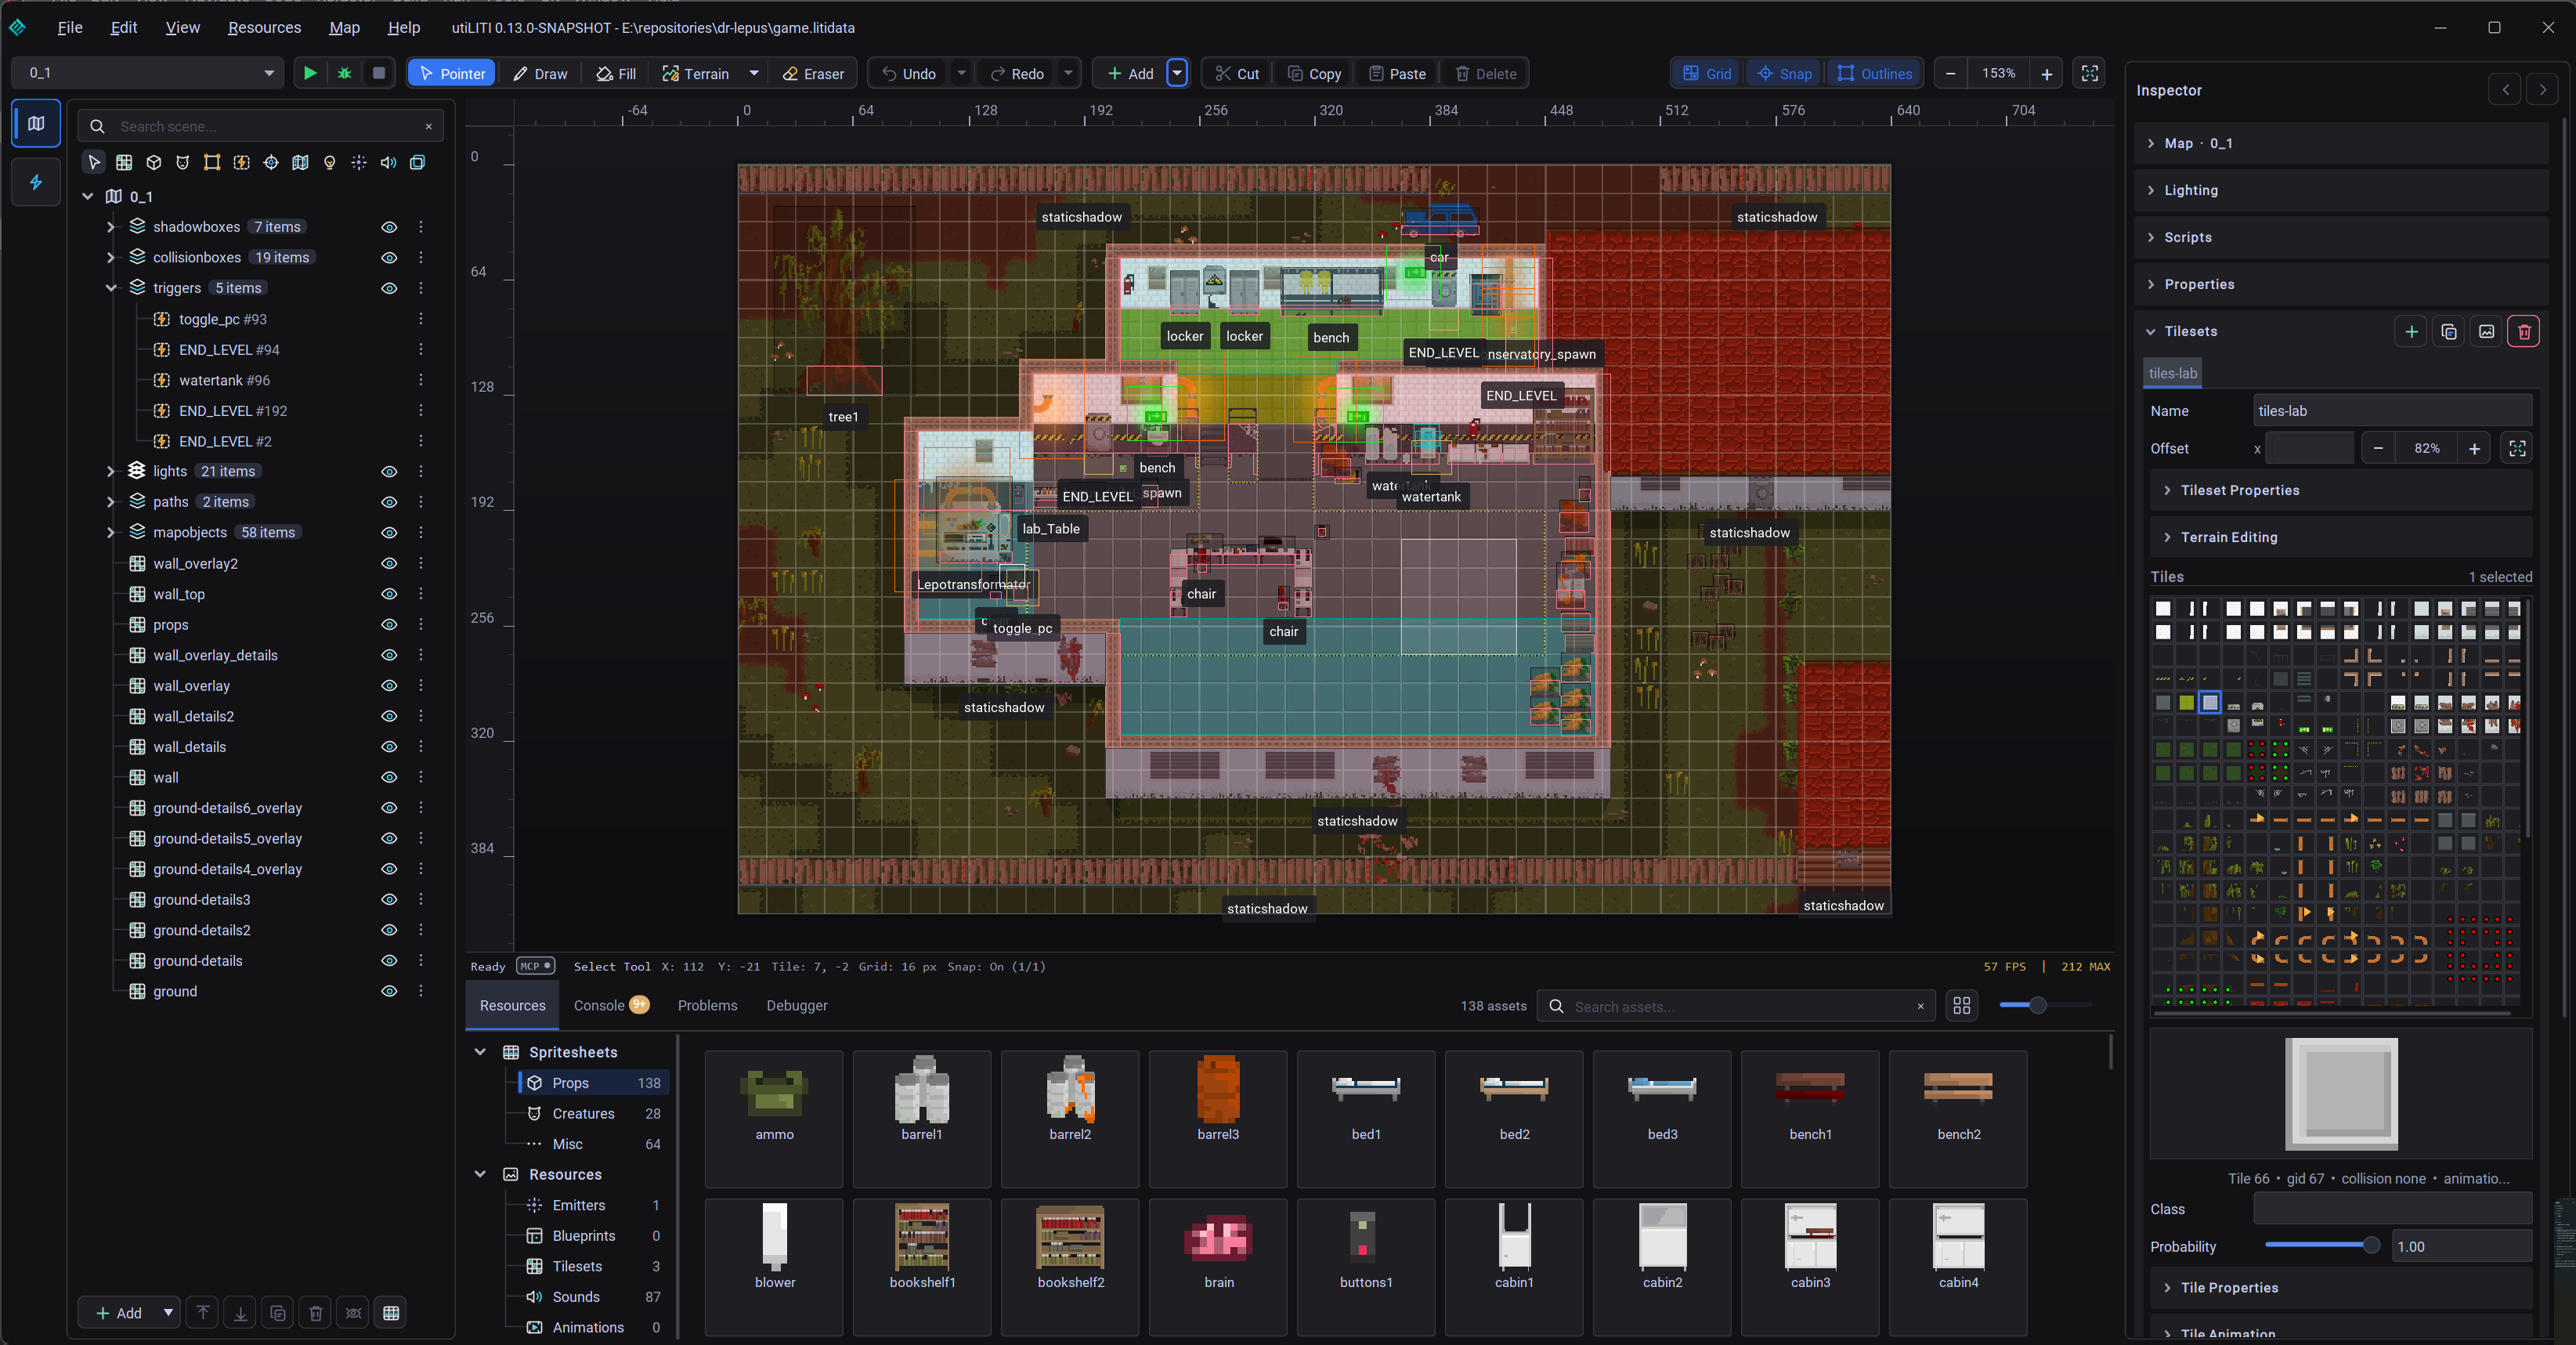 The utiLITI user interface layout featuring the Workspace Rail, Map Viewport Canvas, Entity Hierarchy, Inspector, and Resource Management dock.
1. The Viewport Toolbar
The top toolbar houses primary project controls, active tools, and editing shortcuts:
| Control | Function | Shortcut |
|---|---|---|
| Map Selector | Dropdown showing the currently loaded map; switch between project maps instantly. | — |
| Run Project | Compiles and runs the current project using the standalone runner or Gradle task. | Shift + F10 |
| Debug Project | Launches the game in debug mode with JDI breakpoint support attached. | Shift + F9 |
| Stop Project | Terminates the running game process. | Ctrl + F2 |
| Launch Status Indicator | Displays real-time build and execution status (Building, Launching, Running). | — |
| Tool Selector | Switch between Pointer, Tile Brush, Bucket Fill, Eraser, Stamp Brush, and Wang Terrain tools. | 1–6 |
| Undo / Redo Split Buttons | Click to undo/redo the last action, or click the dropdown arrow to view and jump through the Visual History List. | Ctrl + Z / Ctrl + Y |
Add Entity (+) |
Dropdown menu to spawn new game entities (Props, Creatures, Lights, Triggers, Emitters, custom classes). | Ctrl + 1–0 |
Grid Toggle (#) |
Toggles the visual tile grid overlay. | Ctrl + G |
| Snap Toggle | Toggles grid/pixel snapping on and off during placement and dragging. | — |
| Collision Toggle (``) | Renders static physics collision boxes in real-time. | Ctrl + H |
| Zoom Controls | Zoom in (+), zoom out (-), or reset zoom to 100%. |
Ctrl + + / Ctrl + - |
2. The Map Viewport
The central viewport renders your 2D level using the active LITIENGINE graphics and lighting pipeline.
Viewport Navigation
- Pan / Move Viewport: Hold the Middle Mouse Button (or hold Space and Left Click) and drag across the canvas.
- Zoom: Rotate the Mouse Wheel to zoom in and out centered on your cursor.
- Center on Selection: Press
Spaceto instantly center the viewport camera on the selected entity. - Center on Map: Press
Ctrl + Spaceto center the entire map in the viewport.
Visual Guides
- Coordinate Ruler: Horizontal and vertical pixel rulers along the viewport edges showing exact world coordinates.
- Transparency Grid: Checkerboard background indicating transparent or unpainted map regions.
- Real-Time Light Previews: Dynamic lighting and ambient shadows are composited live on the canvas.
3. Scene Graph & Entity Hierarchy (Objects Tab)
Located in the top-right panel:
- Hierarchical Tree View: Displays all map objects grouped by layer and entity type.
- Search & Filter: Type into the search field to filter entities by name, ID, or tag.
- Selection Sync: Selecting an entity in the hierarchy highlights and focuses it in the viewport and opens its properties in the inspector.
- Multi-Selection: Hold
CtrlorShiftto select and manipulate multiple entities simultaneously.
4. Layer Management (Layers Tab)
Manages the render and depth hierarchy of your map:
| Layer Type | Description |
|---|---|
| Tile Layers | Grids of tile GIDs representing terrain, floors, walls, and decorative tiles. |
| Object Layers | Free-form coordinate layers holding interactive entities, spawn points, and triggers. |
Layer Controls:
- Add (
+): Create a new Tile Layer or Object Layer. - Delete (``): Remove the selected layer.
- Lift / Lower (
⬆/⬇): Move the layer up or down in the rendering order. - Visibility Toggle (``): Hide or show individual layers.
- Solo Mode (``): "Show selected layer only" to focus on a single layer without clutter.
- Color Tint & Opacity: Customize layer tint colors and alpha opacity.
5. Asset Library (Resources Tab)
Located in the bottom-left panel, the Asset Tree organizes all loaded project resources into categorized folders:
Spritesheets: Character and prop animation frames.Tilesets: Tile atlas definitions and Wang terrain sets.Blueprints: Reusable entity presets.Emitters: Particle effect presets.Sounds: Sound effects and audio assets.Animations: Custom frame sequences.Scripts: Attached Java script definitions.
Drag-and-Drop Spawning: You can drag any sprite or blueprint asset directly from the Asset Tree onto the map canvas to immediately instantiate a new
ProporCreatureat that location.
6. Console & Logs (Console Tab)
The built-in console streams engine and editor log output:
- Log Level Filter: Toggle between
ALL,INFO,WARNING, andSEVEREmessages. - Search: Filter log messages by keyword or logger category.
- Clear Console: Wipe the log buffer with a single click.
7. Status Bar & MCP Badge
Located at the bottom of the window:
- FPS Counter: Current viewport rendering framerate.
- Cursor Position: Live world coordinates (
x,y) under the mouse pointer. - Selection Summary: Type, ID, dimensions, and layer of the currently focused map object.
- MCP Server Badge (
[MCP • 1]): - Green indicator when the embedded Model Context Protocol server is active.
- Pulses during active automated tool execution.
- Displays the number of connected external LLM agents. Clicking the badge opens connection endpoints and port details.
8. Quick Search Command Palette (Ctrl + P)
Press Ctrl + P anywhere in utiLITI to summon the Quick Search Palette:
- Search by name or ID to jump directly to any Map.
- Search by name or tag to focus any Entity.
- Search to open any Script or Asset.
- Execute editor commands and menu actions without taking your hands off the keyboard.
9. Inspector Navigation History
Similar to a web browser or IDE, utiLITI tracks the history of inspected objects:
Alt + Left Arrow: Navigate back to the previously inspected entity.Alt + Right Arrow: Navigate forward in inspection history.
10. Toast Notification System
utiLITI provides a floating toast notification system (Toast) positioned at the bottom center of the editor canvas:
- Action Confirmations: Shows transient messages when files are loaded, saved, or when a new Gradle project is scaffolded.
- Interactive Undo Buttons: When destructive operations occur—such as deleting an entity or removing a layer—the toast notification includes an embedded Undo button that immediately reverts the deletion without requiring manual key combinations.
- Automatic Dismissal: Toasts automatically fade out after a brief display duration or immediately dismiss when a new notification arrives.